前言
linux可以使用v2raya代理上网, 参考这里
当然, 喜欢clash的也可以用clash, 本文先介绍基本的http代理上网.
然后介绍强大的TUN模式(对应v2ray的透明代理)上网
clash
首先要获取内核文件, 如下步骤
下载clash内核, 官网已删库, 可以在这找备用的新的. 应该是压缩包, 解压并放置到/opt/clash文件夹.
1
2
3
4
5
6
| gunzip <your-file>
sudo mv <yourfile> clash
sudo mkdir /opt/clash
sudo mv clash /opt/clash/clash
sudo chmod 777 /opt/clash/
sudo chmod +x /opt/clash/clash
|
引入配置文件放到/opt/clash/config.yaml, 这个配置文件就是订阅链接的内容, 自行获取.
如果报错找不到mmdb, 可以在这手动下载然后重命名为Country.mmdb. 并且放到配置目录/opt/clash/. 此时就可以通过/opt/clash/clash -d /opt/clash/启动了
添加系统服务. vim /etc/systemd/system/clash.service, 写入如下
1
2
3
4
5
| [Unit]
Description=clash-core
[Service]
Type=simple
ExecStart=/opt/clash/clash -d /opt/clash/
|
启动系统服务
1
2
3
| sudo systemctl daemon-reload
sudo systemctl start clash
sudo systemctl status clash
|
此时已经可以通过设置软件代理上网了.
终端http代理
如果要设置终端上网如下
1
2
| export http_proxy=http://127.0.0.1:7890
export https_proxy=http://127.0.0.1:7890
|
关闭则如下
1
2
| unset http_proxy
unset https_proxy
|
快捷设置(选做). 在~/.bashrc添加如下. 就可以通过别名启动
1
2
| alias proxy="export http_proxy=http://127.0.0.1:7890;export https_proxy=http://127.0.0.1:7890"
alias unproxy="unset http_proxy;unset https_proxy"
|
UI界面
web ui(选做). 有很多选择, yacd是最常用的. 可以在这里下载ui界面(解压后为public文件夹), 然后在config.yaml中添加如下
1
2
3
| secret: 123456 // 增加这一行, 如果你希望你的clash web要密码访问可以在这块配置密码, 如果不需要直接注释掉即可
external-ui: public // 增加这一行
external-controller: 0.0.0.0:9090 // 记得ip改为0
|
然后重启clash, 就可以通过ip:9090/ui访问了
然后添加api url 为http://外网ip:9090即可
ps: 如果普通用户可以, sudo不行, 使用sudo -E继承环境变量即可
TUN模式
clash-premium可以用过tun模式上网, 虚拟出新的网卡, 代理所有流量.
配置过程都一样, 如上, 在支持TUN模式的内核配置文件中加入如下即可启动
1
2
3
4
5
| tun:
enable: true
stack: system
auto-route: true
auto-detect-interface: true
|
如果要面板切换的话, 得换下面这个内核.
mihomo
mihomo就是以前的clash-meta.
clash-premium这个内核没维护了, 推荐用mihomo(作者跟原有不解的姻缘), 下载地址
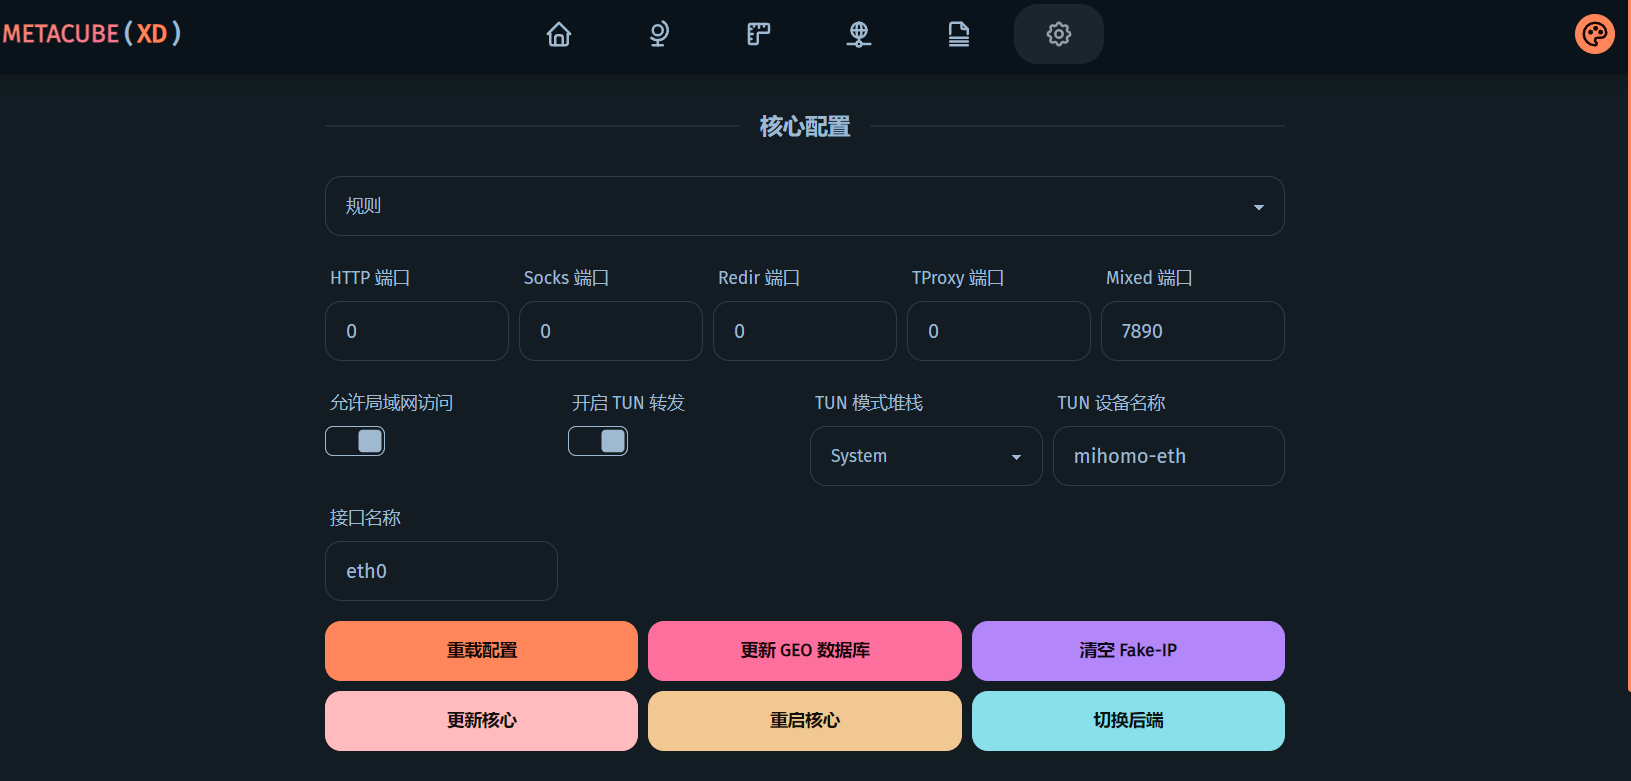
也可以通过支持TUN的面板启动(推荐), 比如mihomo配套的metacubexd面板
配置步骤方法大同小异. 其他文件如下了, 不多赘述
service文件
1
2
3
4
5
6
7
8
9
10
11
12
13
14
15
16
| [Unit]
Description=mihomo Daemon, Another Clash Kernel.
After=network.target NetworkManager.service systemd-networkd.service iwd.service
[Service]
Type=simple
LimitNPROC=500
LimitNOFILE=1000000
CapabilityBoundingSet=CAP_NET_ADMIN CAP_NET_RAW CAP_NET_BIND_SERVICE CAP_SYS_TIME
AmbientCapabilities=CAP_NET_ADMIN CAP_NET_RAW CAP_NET_BIND_SERVICE CAP_SYS_TIME
ExecStartPre=/usr/bin/sleep 1s
ExecStart=/opt/mihomo/mihomo -d /opt/mihomo
ExecReload=/bin/kill -HUP $MAINPID
[Install]
WantedBy=multi-user.target
|
一个示例的配置文件开头
1
2
3
4
5
6
7
8
9
10
11
| mixed-port: 7890
allow-lan: true
bind-address: '*'
mode: rule
log-level: info
secret: your-pwd
external-ui: public
external-controller: '0.0.0.0:9090'
dns:
enable: true
ipv6: false
|
然后如下三连
1
2
3
| sudo systemctl daemon-reload
sudo systemctl start mihomo
sudo systemctl status mihomo
|
之后就可以进入好看的界面

UI界面的https
很多人会遇到无法SSL访问UI的困扰
我们可以通过子域名反向代理(路径代理不行)实现, 这里分享一个nginx反向代理配置.
我的clash端口为55555(external-controller).
把api代理到后端端口, UI代理到单独的后端UI路径即可.
1
2
3
4
5
6
7
8
9
10
11
12
13
14
15
16
17
18
19
20
21
22
23
24
25
| location ^~ /api/ {
proxy_pass http://127.0.0.1:55555/;
proxy_set_header Host $host;
proxy_set_header X-Real-IP $remote_addr;
proxy_set_header X-Forwarded-For $proxy_add_x_forwarded_for;
proxy_set_header REMOTE-HOST $remote_addr;
proxy_set_header Upgrade $http_upgrade;
proxy_set_header Connection "upgrade";
proxy_set_header X-Forwarded-Proto $scheme;
proxy_http_version 1.1;
add_header Cache-Control no-cache;
}
location ^~ / {
proxy_pass http://127.0.0.1:55555/ui/;
proxy_set_header Host $host;
proxy_set_header X-Real-IP $remote_addr;
proxy_set_header X-Forwarded-For $proxy_add_x_forwarded_for;
proxy_set_header REMOTE-HOST $remote_addr;
proxy_set_header Upgrade $http_upgrade;
proxy_set_header Connection "upgrade";
proxy_set_header X-Forwarded-Proto $scheme;
proxy_http_version 1.1;
add_header Cache-Control no-cache;
}
|
参考文章
https://wiki.metacubex.one/
https://zhuanlan.zhihu.com/p/472152669
https://parrotsec-cn.org/t/linux-clash-dashboard/5169
https://www.youtube.com/watch?v=VOlWdNZAq_o