nps搭建内网穿透隧道教程及可能的问题分析
本文介绍
- 内网穿透原理
- nps搭建cs模式的ssh中转隧道
- nps搭建p2p模式的ssh隧道
我所使用的为:
- 一台带公网的云服务器, 作为server
- 一台Ubuntu虚拟机, 作为被控端client1
- 一台windows10主机, 作为访问端client2
(但是, 由于NAT类型不支持, p2p的穿透失败了, 但是过程是对的, 后续会补上p2p的成功教程)
内网穿透原理
先介绍一下nps
nps是一款轻量级、高性能、功能强大的内网穿透代理服务器。目前支持tcp、udp流量转发,可支持任何tcp、udp上层协议(访问内网网站、本地支付接口调试、ssh访问、远程桌面,内网dns解析等等……),此外还支持内网http代理、内网socks5代理、p2p等,并带有功能强大的web管理端。
官方网站
内网穿透原理
内网穿透是一种将内部网络中的服务暴露到公网上的技术,其原理是通过一个中间代理服务器,将公网请求转发到内网中的指定服务上,从而实现内网服务的对外访问。
具体来说,内网穿透的原理如下:
- 在内网中部署一个客户端程序,该程序会与内网中的服务建立连接,并将服务的请求转发到代理服务器上。
- 在公网中部署一个服务器程序,该程序会接收来自代理服务器的请求,并将请求转发到内网中的客户端程序上。
- 当公网用户访问内网服务时,请求会先发送到公网服务器,然后由公网服务器将请求转发到内网中的客户端程序上,最终客户端程序将请求转发到内网服务上,并将服务的响应返回给公网用户。
因此, 内网穿透分为CS模式和P2P模式两种
CS模式所有流量通过公网服务器代理, 比较稳定, 但是带宽受服务器的限制
P2P模式公网服务器仅做连接的媒介, 不稳定, 但是带宽仅受客户端限制, 很快
但是, p2p模式是否成功会跟NAT的模式有很大关系
在STUN标准中, NAT模式有4种:
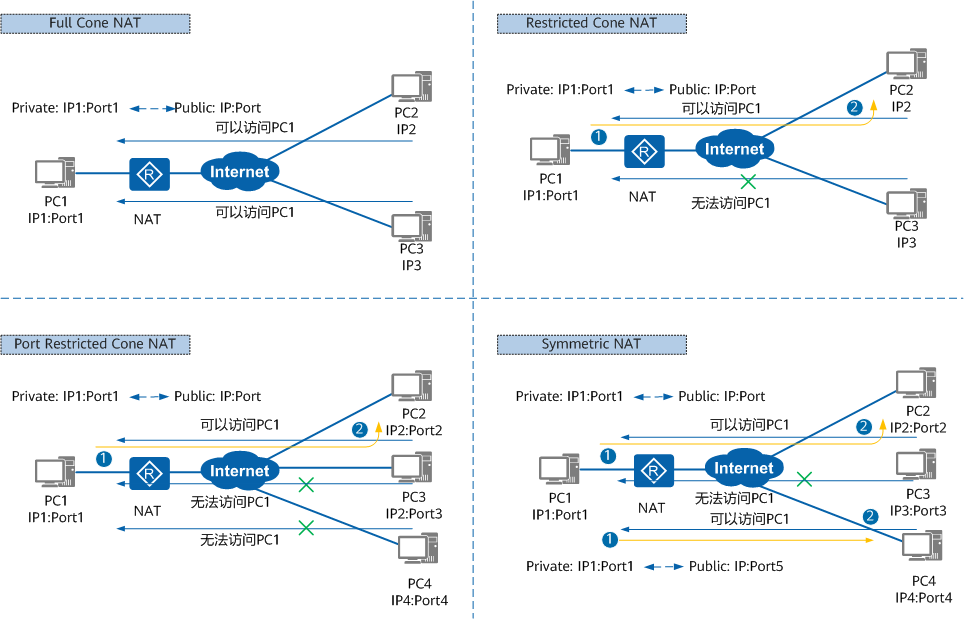
- Full Cone NAT(完全锥型NAT)
所有从同一个私网IP地址和端口(IP1:Port1)发送过来的请求都会被映射成同一个公网IP地址和端口(IP:Port)。并且,任何外部主机通过向映射的公网IP地址和端口发送报文,都可以实现和内部主机进行通信。
这是一种比较宽松的策略,只要建立了私网IP地址和端口与公网IP地址和端口的映射关系,所有的Internet上的主机都可以访问该NAT之后的主机。 - Restricted Cone NAT(限制锥型NAT)
所有从同一个私网IP地址和端口(IP1:Port1)发送过来的请求都会被映射成同一个公网IP和端口号(IP:Port)。与完全锥型NAT不同的是,当且仅当内部主机之前已经向公网主机发送过报文,此时公网主机才能向私网主机发送报文。 - Port Restricted Cone NAT(端口限制锥型NAT)
与限制锥型NAT很相似,只不过它包括端口号。也就是说,一台公网主机(IP2:Port2)想给私网主机发送报文,必须是这台私网主机先前已经给这个IP地址和端口发送过报文。 - Symmetric NAT(对称NAT)
所有从同一个私网IP地址和端口发送到一个特定的目的IP地址和端口的请求,都会被映射到同一个IP地址和端口。如果同一台主机使用相同的源地址和端口号发送报文,但是发往不同的目的地,NAT将会使用不同的映射。此外,只有收到数据的公网主机才可以反过来向私网主机发送报文。
这和端口限制锥型NAT不同,端口限制锥型NAT是所有请求映射到相同的公网IP地址和端口,而对称NAT是不同的请求有不同的映射。
也就是说, 要实现p2p模式, 两个客户端不能都是对称型NAT, 否则不能成功
然而我所在的校园网都是对称性NAT, p2p实验没法成功 (开专! 输! )
检测NAT的方法可以看文章末尾
下载并启动nps
通过上面的原理可知, 我们需要一台有公网的服务器(安装nps), 和若干个客户端(npc)
下文我们称服务器为server, 被控客户端为client1, 访问端为client2.
即我在client2上通过server建立p2p连接, 访问到client1
注意: nps和npc分别是在服务端server和客户端client上安装, 使用命令时要注意拼写
下载
首先服务端server下载并解压nps
1 | wget https://github.com/ehang-io/nps/releases/download/v0.26.10/linux_amd64_server.tar.gz |
客户端client下载npc
推荐使用docker的方式
1 | docker pull ffdfgdfg/npc |
当然, 也可以自己手动下载, 如下
Linux平台
1 | wget https://github.com/ehang-io/nps/releases/download/v0.26.10/linux_amd64_client.tar.gz |
windows平台自己下载解压, 点击这里下载
启动nps
首先进入nps目录编辑配置
1 | sudo vim /etc/nps/conf/nps.conf |
示例如下
其中, 需要修改的地方如下, 我都留成TODO了
- http_proxy_port(我的是7997,防止冲突)
- https_proxy_port(我的是7998)
- bridge_port(我开放的是8000)
- public_vkey
- p2p_ip(如果要用p2p服务的话)
- p2p_port
- web_username
- web_password
- web_port(我开的是7999)
1 | appname = nps |
PS: 记得开端口, 既要在服务器防火墙上设置开启, 又要在服务器的供应商那里开放安全组
服务端直接执行如下启动
1 | sudo nps start |
然后执行
1 | sudo cat /var/log/nps.log |
可以看到如下的这种就成功了

搭建隧道
CS模式
CS模式时, client通过server当桥梁, 流量都经过server中转.
也就是, 在访问端client2通过访问<服务器IP>:<端口>即可定向到被控端client1
我们使用docker容器的方式安装, 毕竟相对方便
首先在client1, 即被控端, 找个地方建立一个文件夹conf, 比如我是在~/test/conf
1 | mkdir conf |
在客户端client1的配置文件npc.conf修改如下
其中注意
- server_addr是自己服务器server的访问IP和端口, 比如我的是8000
- vkey要修改成一个独立不重复的, 这是客户端的key
- target为客户端client1上你要访问的目的端口, 一般而言就是localhost:22表示ssh连接
- server_port为我们访问服务器的端口, 会定向到client1去
1 | [common] |
访问端, 也就是client2, 无需配置
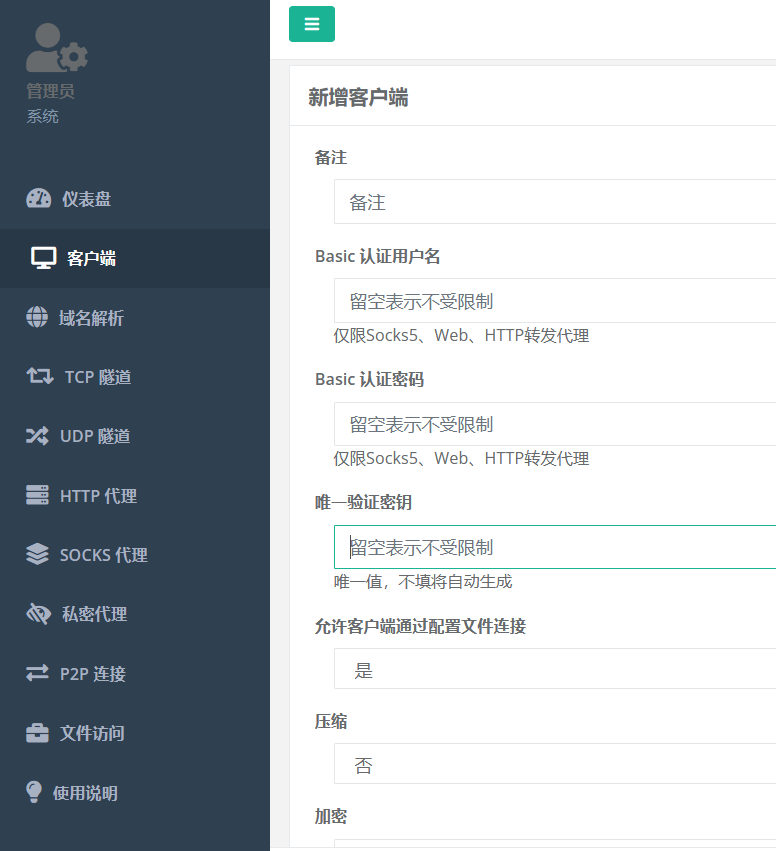
接着在nps的web控制面板添加一个客户端
验证密钥要和client1的一样, 下面的加密和压缩都填是, 如下
然后在client1上, 通过docker容器启动npc (记得修改本机的conf目录为刚刚创建的配置目录)
1 | docker run -d --name npc --net=host -v <本机conf目录>:/conf ffdfgdfg/npc -config=/conf/npc.conf |
比如我在user用户目录下的test挂载, 就是如下
1 | docker run -d --name npc --net=host -v /home/user/test/conf:/conf ffdfgdfg/npc -config=/conf/npc.conf |
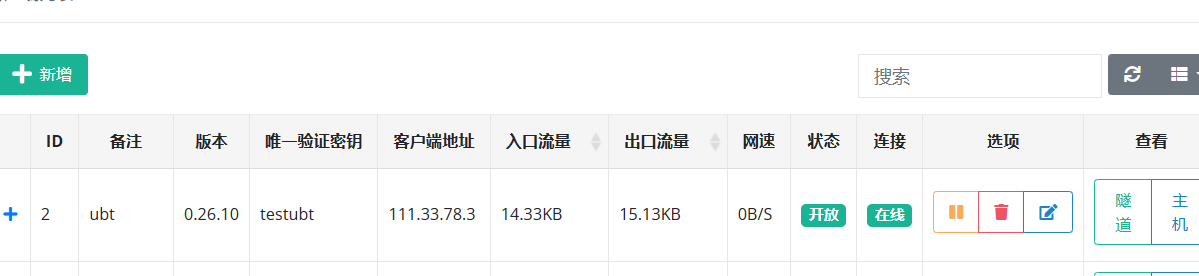
此时在server面板上可以看到如下已连接
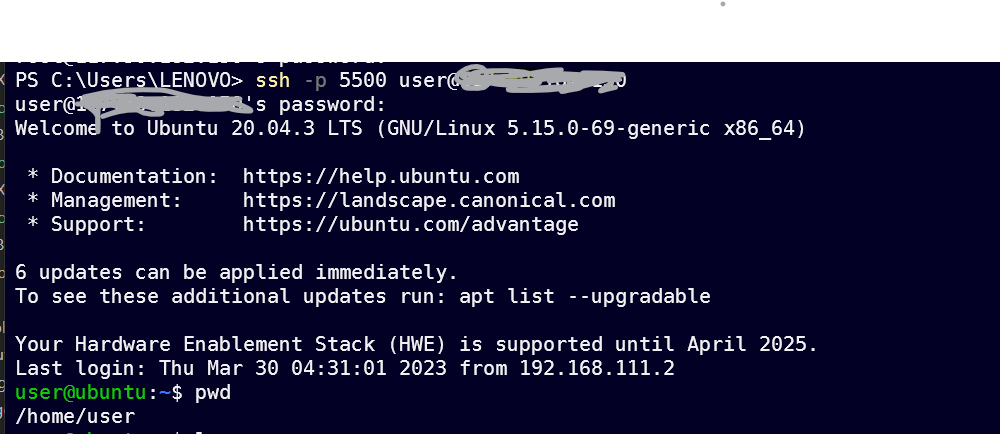
然后在访问端client2执行如下
1 | ssh -p <PORT> username@IP |
比如我的port是5500, IP填服务器公网IP(也可以是域名)
如下, 访问成功
p2p模式
p2p的原理是客户端client1和server保持长期连接, 我们通过另一个客户端client2去访问server对应端口, 并使用独特的密码标识, 就可以通过server打通两个客户端的隧道, 就可以访问到client1
我们还是使用docker容器的方式安装, 毕竟相对方便
首先在client1, 即被控端, 找个地方建立一个文件夹conf, 比如我是在~/test/conf
1 | mkdir conf |
在客户端client1的配置文件npc.conf修改如下
其中注意
- server_addr是自己服务器server的访问IP和端口, 比如我的是8000
- vkey要修改成一个独立不重复的, 这是客户端的key
- p2p的password也要修改成独立不重复的, 自定义
- target为客户端client1上你要访问的目的端口, 一般而言就是localhost:22表示ssh连接
1 | [common] |
在访问端, 也就是client2, 配置文件如下
要注意的也和上面一样, 此外多了一个local_port, 这个就是通过client2访问时, client2上的端口, 自定义即可(不指定也行, 默认为2000)
1 | [common] |
接着在nps的web控制面板添加一个客户端
验证密钥要和client1的一样, 下面的加密和压缩都填是, 如下
然后在client1上, 通过docker容器启动 (记得修改本机的conf目录为刚刚创建的配置目录)
1 | docker run -d --name npc --net=host -v <本机conf目录>:/conf ffdfgdfg/npc -config=/conf/npc.conf |
比如我在user用户目录下的test挂载, 就是如下
1 | docker run -d --name npc --net=host -v /home/user/test/conf:/conf ffdfgdfg/npc -config=/conf/npc.conf |
此时在server面板上可以看到如下已连接
然后在访问端client2的npc的目录, 执行如下命令即可
1 | ./npc.exe -server=<IP>:<Port> -vkey=testubt -type=tcp -password=pwdforssh -target=localhost:22 |
不出意外, 此时应该会成功启动, 显示内容参考如下
2023/04/30 20:38:59.274 [I] [npc.go:231]  the version of client is 0.26.10, the core version of client is 0.26.0
2023/04/30 20:38:59.317 [I] [control.go:97]  Loading configuration file C:\Users\LENOVO\Desktop\windows_amd64_client\conf\npc.conf successfully
2023/04/30 20:38:59.391 [N] [control.go:174]  web access login username:user password:testubt
2023/04/30 20:38:59.394 [I] [local.go:115]  successful start-up of local tcp monitoring, port 2999
2023/04/30 20:38:59.444 [I] [client.go:72]  Successful connection with server 117.50.182.150:8000
2023/04/30 20:39:00.392 [N] [local.go:142]  try to connect to the server 1
2023/04/30 20:39:28.829 [D] [local.go:117]  new p2p connection
此时, 再在访问端client2执行如下命令
1 | ssh -p 2999 root@127.0.0.1 |
即可成功连接client1(我的因为NAT不支持, 没成功)
debug过程
port or host may have been occupied
p2p模式启动时, 访问端client2显示如下
[control.go:158] The server returned an error, which port or host may have been occupied or not allowed to open. ssh_p2pmode
原因是端口没开
此处注意要开放2个地方, 在系统防火墙里开端口, 还要去服务器供应商那里开安全组的端口
connection refused
客户端无法连接到nps, 连接被拒
我们通过执行如下命令
sudo cat /var/log/nps.log
查看nps的日志文件
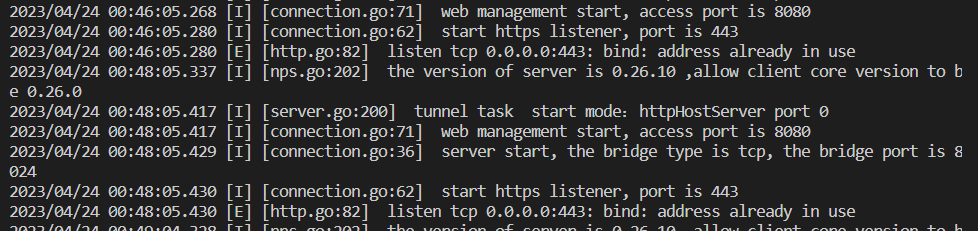
可以看到, 端口已被使用, 需要换一下端口, 改一下nps配置文件即可
read session unpack from connection
客户端出现如下错误
mux: read session unpack from connection err read tcp 198.18.0.1:50290-><ip>:8000: use of closed network connection
原因是客户端的配置文件出错
查看服务器日志可以发现如下, 这里是key没有唯一, 所以认证出错, 网络被关闭.
改一下认证key即可

invalid syntax
客户端启动报错如下
2023/04/27 03:09:38.334 [E] [control.go:290]  strconv.Atoi: parsing "": invalid syntax
2023/04/27 03:09:38.334 [E] [control.go:310]  strconv.Atoi: parsing "": invalid syntax
2023/04/27 03:09:38.334 [E] [local.go:206]  strconv.Atoi: parsing "": invalid syntax
2023/04/27 03:09:38.335 [N] [local.go:142]  try to connect to the server 2
2023/04/27 03:09:38.334 [E] [control.go:290]  strconv.Atoi: parsing "": invalid syntax
2023/04/27 03:09:38.336 [E] [control.go:310]  strconv.Atoi: parsing "": invalid syntax
2023/04/27 03:09:38.336 [E] [client.go:126]  strconv.Atoi: parsing "": invalid syntax
2023/04/27 03:09:38.388 [E] [control.go:290]  strconv.Atoi: parsing "": invalid syntax
原因是配置文件错误, 多余了或者少了, 删除无用条目即可
(官方文件这里真的不人性化, 给的配置过多了, 不用得删)
NAT类型不支持
如下, 在解决好一切艰难险阻之后, 仍然出问题了, 访问端client2显示如下

maybe the nat type is not support p2p
说明我们的NAT类型不支持
Linux查看NAT类型可以使用如下命令
1 | sudo apt-get install stun |
我的显示如下, 0x000012类型就是NAT4, 即symmetric NAT, 很垃圾, 不能p2p穿透
STUN client version 0.97
Primary: Independent Mapping, Independent Filter, random port, no hairpin
Return value is 0x000012
为什么NAT4不支持p2p?
因为NAT4每次建立新的连接时IP和端口都会变化, 而p2p建立连接之前是通过server通信, server会告诉客户端另一个客户端的地址.
而建立p2p连接时, 此时就又算另一个连接了, 如果是NAT4, 新建立p2p连接时地址和端口就对不上之前server告诉的地址和端口, 于是失败
参考文章
https://ehang-io.github.io/nps/
https://hub.docker.com/r/ffdfgdfg/npc
https://info.support.huawei.com/info-finder/encyclopedia/zh/NAT.html